
Are you wondering how you can take photos of sumptuous whisky bottles or a refreshing glass of whisky? Whisky photography is one of the most challenging yet fun sub-categories of beverage photography. We’re sharing tips on becoming a whisky photographer so you can shoot magazine-worthy images and secure bookings.
How to Become a Whisky Photographer
Becoming a whisky photographer involves learning lighting, composition, and styling techniques. You also have to invest time practicing using different camera settings, equipment, and props. A beverage photographer must also know how to tell a story through a single picture.
As you venture into the world of whisky photography, it’s vital to arm yourself with the correct information and training to hone your craft.
The Job of a Whisky Photographer
Whisky photography is a tricky sub-genre of food and product photography. Photographers who take photos of whisky must form an emotional connection between the viewer and the subject. The goal is to depict the whisky clearly and entice viewers to want the drink right away.
A whisky photographer must know how to take brand-defining bottle photos. It’s also the job of a whisky photographer to capture the heart of drinking whisky, from the distillery to barrel to bottle.
However, it’s more than reflecting the brand’s target audience and the actual product’s message. A photographer must artistically show the beverage and highlight details and textures.
Tips on Becoming a Whisky Photographer
Photographing drinks may look simple at first, then wait until your setup gets wet from ice or the glass causes glare in the sensor. To save you from such trouble, there are several tips to master the art of capturing editorial-style whisky photos.
Learn Proper Lighting
The main lighting challenge in photographing whisky is the reflection from glasses. The best way to solve this is to use soft lighting to soften the shadows and control reflections.
Furthermore, backlighting helps avoid reflections by putting the light source directly behind and slightly above the subject. This also adds depth to glass surfaces while producing silky highlights of the liquid’s swirls.
Plan the Colors
It’s ideal to use complementary colors to add vibrancy to your shots. You can apply the colors to the background, props, or garnishes.
Choose colors that complement the brown, straw-yellow, dark burgundy, or deep orange hues of whisky. Go for darker backgrounds that can make the drink’s colors shine, including deep gold, old oak, and chestnut.
Experiment with Angles and Compositions
Among the simplest compositions involves playing with the depth of field. Try to shoot from a distance, focus on the subject, which could be a whisky bottle or glass, then blur the surroundings.
The rule of thirds still applies, wherein you would place the glass or whisky bottle in one of the intersection points. The 45-degree angle is ideal for shooting whisky as if the viewer is sitting in front of the drink. You can also shoot from just below the table level to add drama.
If you have several objects in the setup, be sure to leave white or empty space for breathing room. This should also give you an allowance for cropping later.
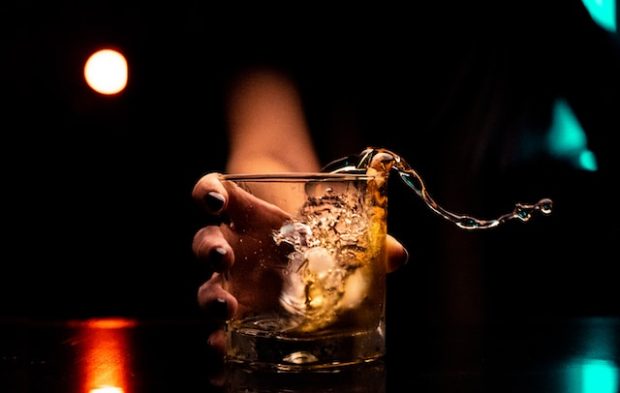
Add Props or Human Element
Drinks can be one-dimensional, so adding props and a human element can make your shots more relatable. For example, have a model reach out for the whisky bottle or glass. Make sure that the model matches the drink’s personality, like determination and mysteriousness.
For the props, put curved objects near the frame’s corners to help frame the subject.
Styling Whisky Photos
Whisky consumption in America reached 3.46 million 9 liter cases in 2019. With brands continuing to manufacture whisky, you’ll need to keep your shots visually interesting. You can do that by styling whisky photos effectively.
One of the best ways to style whisky shots is to follow the rule of odds. This technique uses an odd number to group the subjects and props for a more cluttered yet visually appealing composition. You can also position the objects diagonally or form a triangle.
To maintain condensation, use water and glycerin mix, then spray it to the whisky bottle. Also, use acrylic ice cubes and garnishes to add texture without ruining the whisky’s color.
The Best Equipment for a Whisky Photographer
As with other kinds of photography, having the right tools is crucial in capturing the best whisky photos.
- Camera body: Whether you prefer a full-frame DSLR or mirrorless camera, you should be able to adjust exposure and shooting settings manually. The camera body should also let you attach lenses of various focal ranges.
- Lens: A 50mm lens is a good starter lens for whisky photographers as it has a broad angle of view. You can also use 95-105mm macro lenses with big maximum apertures for a shallow depth of field.
- Tripod: A tripod is another essential tool for taking whisky photos. It ensures consistency in lighting and camera angles.
- Lighting: You need a light kit with external flashes and softboxes to apply different lighting effects.
- Accessories: While optional, you may use a polarizing filter to remove glare, as well as a diffusion panel or reflector to spread light.
The Best Camera Settings for Whisky Photography
The global whisky market expects a 6.4% growth between 2019 and 2025 due to changing lifestyles and increasing disposable income levels. With such growth, the industry opens job opportunities for whisky photographers.
One way to compete with other creatives is to ensure quality whisky photos, and you can achieve that by applying the correct camera settings.
-
- Shooting Mode: Choose manual mode if you prefer complete control over the exposure settings. If you need assistance, you can also opt for aperture priority, which lets you set the aperture value while the camera applies the corresponding shutter speed.
- Aperture: Use the lowest f-stop values to let more light reach the camera sensor. Depending on the lens, you can experiment between f/2.8 to f/5.6.
- Shutter speed: Motion, such as splashes, is common in whisky images. Use fast shutter speeds to freeze motion.
- ISO: Keep the ISO to base values, usually ISO 100, to minimize image noise and improve focus.
Conclusion
Becoming a whisky photographer has its fair share of challenges, yet it also provides many learning opportunities. As long as you practice and follow our tips, you can develop your whisky photography skills and take photos for the top whisky brands.
Read More:
Finding beauty in the ordinary: a photographer’s perspective
